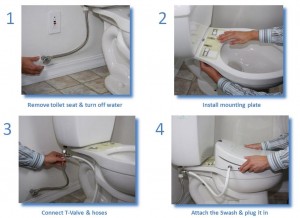
Contrary to popular belief, it’s not difficult to install a bidet seat on your existing toilet. If you’re handy with a screwdriver, pliers, and a wrench, you’ll see that installing your new bidet seat is simple!
Disclaimer: Before you begin a bidet seat installation, (and maybe before you buy a bidet seat), you need to address the issue of electricity in your toilet room. If your one of the lucky ones whose house is under construction, or not yet built, you have the unique opportunity to have your electrician install grounded outlets in all of your toilet rooms. Even if you don’t need an outlet there now, you may decide to install a bidet seat in that room in the future. Doing it now will save you lots of trouble and a few dollars down the road. If you’re like most of us, however, then you’re stuck with a toilet room that has no access to an power outlet. If that’s the case, your best bet is to call an electrician or a handyman qualified to work with electricity, and have an outlet installed. Plan to spend $100 – $150 (could be less depending on your toilet room’s proximity to the nearest outlet). We don’t advise that you install an outlet on your own unless you’re skilled with electricity and the requirements of having an outlet close to a water supply.
When you’re ready to install your new bidet seat, gather your parts and tools, and be sure to have some teflon tape handy. These are the general steps for installation:
- Remove the existing toilet seat. You’ll probably need a screwdriver and a pair of pliers. Once the existing seat is removed, take advantage of the rare opportunity to clean all the usually-hidden areas!
- Turn off the water supply to the toilet.
- Unscrew the water supply tube from the water valve.
- Add a new water supply tube to the wall valve, then attach it to the 3-way valve included in your bidet seat’s parts bag.
- Attach the existing water supply tube to one of the outlets on the 3-way valve (some valves may screw directly on to the toilet’s water tank, in which case you won’t need an extra water supply tube).
- Install the bidet seat’s mounting bracket according to the manufacturer’s instructions.
- Attach the bidet seat to the mounting bracket (this is usually a simple slide and click operation).
- Attach the bidet seat’s water supply tube to the other outlet on the 3-way valve.
- Slowly turn on the water supply and check for leaks.
- If everything looks good, plug in your new bidet seat and test it out!
Be sure to use teflon tape on all water supply connections.
Please leave a comment to let us know how your installation went.

